Sunday, November 24, 2013

We Should Cocoa Challenge #39: Cookies


Every month on the We Should Cocoa challenge run by Choclette over at Chocolate Log Blog there is a different ingredient pairing or type of dish that we are invited to make. The only proviso is that it must include chocolate and for this month the challenge has been set by guest blogger BakenQuilt and it is 'Cookies with Chocolate'.

Now it may only be November but for me and many others there is a lot of Christmas preparation already underway and I really enjoy the pre-Christmas baking in the lead up to the big day. In particular I have long admired the American tradition of Christmas cookie exchanges and the amazing array of Scandinavian cookies that are baked and consumed in such generous quantities each advent. Many Christmas cookies do not include chocolate but there is one cookie that to me looks particularly festive and fits the criteria for this We Should Cocoa challenge perfectly and it is the Chocolate Crackle Cookie.


I have a wonderful book full of festive cookie recipes written by Rose Levy Berabaum called Roses Christmas Cookies and I use the Linzer cookie recipe in there often, but for this challenge I have hopped over to a very fine blog that I have long admired called dailydelicious. This blog is a wonderful source of inspiration for all manner of baked goods and the cookie section alone could keep me busy for weeks.

Please skip over to the blog itself for the recipe where you will find clear instructions and some useful step by step photos. The only modification I made to the chocolate crackles recipe was at the end.  The author has the raw cookie balls rolled in both granular and icing sugar before baking but I just rolled mine in icing sugar.  This is purely personal preference as I am not fond of the texture of gritty sugar. I used a 70% cocoa solids chocolate and a premium cocoa powder that is relatively high in cocoa butter. These no doubt added to the intensity of the flavour. The cookie dough is relatively soft and I found it useful to portion the dough with a small diameter ice-cream scoop. You want to keep the cookie balls even in size for an even bake.

The baked cookies have a crisp outer shell and a melting centre, not too sweet and not cloying either. Totally delicious and perfect with a coffee or perhaps a glass of mulled wine.


I still have a lot of Christmas baking to go but earlier in the month I baked my xmas linzer cookies from Rose's Christmas Cookies:


And also some chocolate hazelnut kisses which are really little more than a nutty meringue sandwiched together with a hazelnut praline ganache:


So Happy Christmas baking from my Devon kitchen.

Wednesday, October 30, 2013

Pita Perfection

So a casual question from a friend had me wondering why I hadn't baked the pita breads in my previous post on 'pita au chocolat'. I love baking bread and I am a huge fan of pita so why have I only tried to bake them once in my life and then allowed my failure to put me off for over 20 years. So another attempt was well overdue and I am delighted to report this batch put an end to my pita baking anxieties.

The recipe, available online, came from Dan Lepard, and truly lives up to its title Perfect Plain Pita , published in the Guardian way back in 2007. The recipe is also included in his excellent baking book Short and Sweet.

This dough is quite soft, well frankly quite sticky, and I found myself slowly kneading in a little extra flour.  I know the current mantra in 'real bread' is that wet is better and I'm not in disagreement, but there comes a point when the 'better' dough is the one you can actually cope with and if that means a little extra flour well so be it. Better to enjoy the process and trade off a not so perfect texture than to be bossed around in your own kitchen by an amorphous mass of flour and water.

So my dough ball was no doubt a little firmer than it should be but it was still quite 'flowing' until I had gone through the stages of kneading lightly every 10 minutes for three times and then the 30 minute rest.  So here it is at the end of that stage.


The dough is then portioned up into 100g pieces and a plastic dough cutter is really useful here.


The dough is still pretty sticky and although I have a more than  a 'light dusting' of flour on the counter top I do try to not work the flour into the dough. The dough balls are rested under a cloth for 15 minutes and during this time the oven should be on preheating. Place a good thick baking tray in there as well so the dough goes onto a really hot surface straight away. My oven has a circotherm intense setting that heats to 270C which I use for these as like with pizza you are aiming at a short intense bake.

The rested dough portions are then rolled out into the traditional ovals and rested for a couple more minutes each before baking. I had them on a flat tray for this rest so that they can be slipped straight off this tray onto the hot tray in the oven as quickly as possible rather like using a pizza peel. 


Then the magic starts as the breads balloon up in the oven into magnificent puffs and within 5 minutes you have piping hot and beautifully tender pita.


The baked pita are placed on a rack and covered with a cloth to keep them soft and tender. Check the oven is back up to temperature before you pop in the next batch and pretty soon you will be looking at a beautiful batch of tender pita that I hope you will be very proud of. I may never buy pita bread again!


Friday, October 25, 2013

Pita au Chocolat

I live many miles from any half decent bakeries that might turn out a pain au chocolat worth the calories so when nothing but a freshly prepared 'chocolate pastry' will do this in my book is a pretty good and near instant alternative (all things considered).

I have been a fan of pita bread since I was a student, which is now ancient history, so I am a little biased when it comes to selling the virtues of the humble pita.  So here you are, two ingredients, about two minutes prep and you have a freshly warm from the toaster chocolate 'pastry'.

I start by splitting the pita in half before toasting. Time is of the essence once toasted and you do not want too many holes and splits created as you pull the toasted pita apart.


Have your chosen chocolate at the ready and thinner squares are best here to aid rapid melting. I like to use about a 60% plain chocolate, fairly sweet as plain chocolate goes, but still with enough cocoa flavour to pack aroma once melted.

Toast the pita halves briefly so that they are really hot through but not starting to go at all crispy. Then split each half to make the 'pockets'. Try not to make holes unless you like messy chocolate fingers.


Now working quickly, pop the slabs of chocolate into your pita pockets and push together to aid the melting. If you have used quite thick chocolate you may need to give the filled pocket a brief warm either by popping into the microwave for a few seconds (no more) or placing the pocket on top of the still warm toaster (risky this one as you may end up with chocolate inside the toaster).

You might also want to add a healthy fruit garnish at this stage.

Then as soon as you have a good melt on the chocolate and while the whole thing is still nice and warm enjoy!


Beats a pop tart any day.


Thursday, October 24, 2013

We Should Cocoa Challenge #38 Chocolate & Vegetables

This month's We Should Cocoa challenge comes to us from jibberjabberuk who has picked vegetables as the guest ingredient to combine into our chocolate creations.

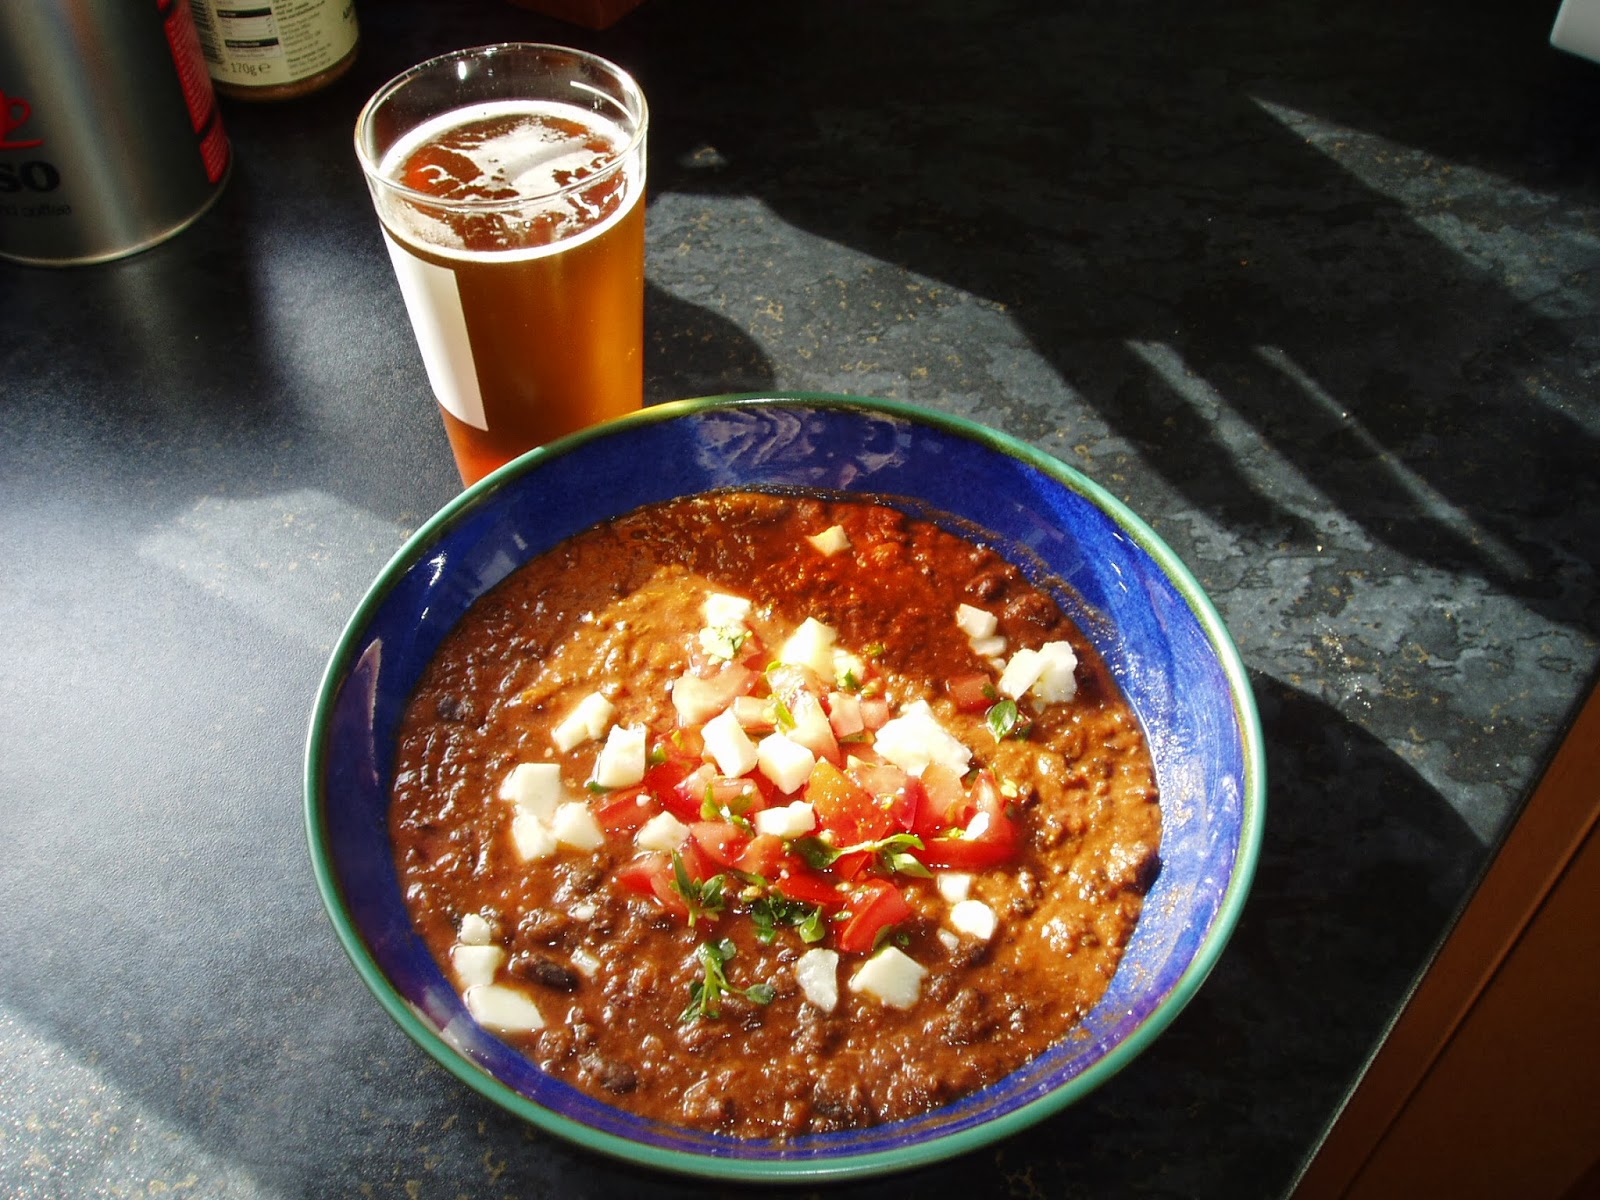
I seem to have eaten a lot of cake and sweet stuff in recent weeks so I set about picking a savoury recipe and with the help of the Eat Your Books service I was quickly looking at a whole range of options for sneaking chocolate into savoury creations. The recipe that really stood out for me though was this black bean soup with chocolate and chillies by Dennis Cotter.  This particular recipe was taken from the internet but I have three of his books and the recipes are nothing short of genius. They are all vegetarian and although it can take quite a while to put a whole dish together the results are the sort of dishes you would serve to any mixed group of vegetarians or meat eaters and not feel anyone would be disappointed.


The recipe calls for black kidney beans but I used some really tasty small black beans from Brazil; the sort that are used in the national dish Feijoada.   I had to substitute the chipotle chilli with some red chilli flakes and the avocado I had purchased for the salsa was rock hard so that was abandoned but otherwise I kept quite close to the recipe.

 The spices of cumin, coriander and allspice give the soup a lovely warm depth and when you stir in the chocolate right at the end the soup darkens and stops looking like 'just bean stew' and suddenly like something quite sophisticated. I did add some white cheese to my improvised salsa but that was more to do with having too much cheese in the fridge.

So the vegetables that go into the soup include onions, garlic, fresh red pepper, celery and tomato and in the salsa you should have avocado, scallions and coriander.

The soup reheats very well and you can easily add other ingredients like cooked chicken, pork,  yoghurt, tortilla chips to add variety.

Oh and it goes really well with a glass of beer!

Sources for some of the ingredients:
Black turtle beans are similar to the beans I used and are available from www.mexgrocer, melbury and appleton and some larger supermarkets
Chipotle chillies can be bought in tins from specialist grocers like the 'mex grocer' above and my old favourite from visits to Edinburgh- lupe pintos

Oh, and as we are talking about chocolate you can also get these lovely mexican hot chocolate stirers from 'mex grocer', they are called  molinillo  

Chocolate Stirrer - Mexican wood molinillo
 

Tuesday, September 10, 2013

We Should Cocoa Challenge #37 : Chocolate Showstopper


The theme for this month's We Should Cocoa challenge came at a very good time for me as I was already planning a chocolate based caked for the September meeting of the North Devon group of the Clandestine Cake Club. The theme for this meeting was 'Royal Connections' and I had chosen to try and create an orb in chocolate, much influenced by Vivienne Westwood's use of the orb as her logo and also her connections with the Sex Pistols and their rather edgy for it's time record 'God Save the Queen'.

It is one thing to dream up an idea but as with so many of my practical projects the reality of creating it soon kicks in and scares me; so my orb is rather more punky in its presentation than I had imagined but hey that fits with my theme and it all tastes the same.


The orb was made by taking one of these polycarbonate 'gift box' shapes which work well with chocolate as the surface is ideal for getting a good shiny finish to the chocolate and they are easy to unmould. I have seen these for sale in craft shops and they come in quite a range of shapes such as aeroplanes, rabbits, trains etc.


To get a whole sphere pour the tempered chocolate into one half, about two thirds full, push the two halves together and then swirl around trying to keep as little hand contact with the mould as possible.
 
If the mould is held for a long time in a warm hand it can push the chocolate out of temper and at this point you want the chocolate to start setting up pretty quickly. Only unmould once completely cool. I had a crack or two in some of my orbs so it took more than one go, but tiny cracks can often be ignored if you can decorate over them. The cross mounted onto the orb was run out from chocolate in a small piping bag onto wax paper with the  pattern outline on a sheet of paper underneath.  You can keep moving the underlying pattern across the wax/silicone paper sheet until you are happy you have enough good copies to work with.
 
The decoration was applied to the orb with royal icing and used some glace cherries, candied citron and sugar pearls.
 
I decided a ring mould was the best way to support the orb and used a fairly cheap silicone mould from a supermarket. The crown like shape was all but lost by the time I had  finished as the cake did not fill the mould and the icing  further obscured the shape. However, it did have an ideal narrow middle so the orb did not disappear down into the centre of the cake.


The cake itself was a basic sponge with flavourings from Grand Marnier, finely chopped orange zest, cinnamon, ginger, allspice and cardamom.
 
The chocolate glaze recipe was taken from a new book from Daylesford Organic titled A Love for Food. I bought this in Kindle format as I am totally running out of shelf space. I am still not a great fan of Kindle books but will just have to get used to them as unlike my waistline, my house is not getting any bigger with age. This is a good store cupboard recipe as no cream is required.
 
So for the chocolate glaze you gently warm together :
 
300g good dark chocolate, 125g butter,  75g golden syrup and  60ml sunflower oil.
 
I then kept regularly stirring the glaze as it cooled until it was think enough to coat but not so runny as to just run off when poured. Things got pretty messy at the coating stage but a lot of kitchen paper towel and a much cursings later I had a cake more or less covered with glaze.  I let this sit for a while to firm up before gently placing the orb in the middle and a few crosses around the outside.
 
Thankfully it arrived at the cake club in one piece.


Sunday, August 25, 2013

We Should Cocoa - Caramels

This month's We Should Cocoa challenge is being hosted by Elizabeth's Kitchen Diary and Elizabeth has asked us to produce a 'chocolate', bon bon, candy call them what you may and the main restriction was that whatever we produced had to be consumable in no more than 3 bites! Well  3 bites is still a pretty sizeable morsel so not too restictive there.

I chose to make chocolate caramels as this is my confectionery grail, the one chocolate I so wish I could make reliably and without fear.


I have tried a few recipes over the last few christmases and I suspect it is not so much the recipe as the technique that is giving me problems. Keeping every grain of crystallised sugar out of the caramel and getting the temperature just right are all part of the precision that I struggle to achieve. This time I used a William Curley recipe for chocolate caramels from his book Couture Chocolate. This is a book well worth buying if you become a little obsessed by chocolate. It covers a range of chocolate creations, many of which are sold in his shops, and I particularly like his take on caramels which are never too sweet.

I cannot find any of his caramel recipes published on the web so I will link you to my favourite sea salt caramel recipe from David Lebovitz, which I have produced several times, and for a basic caramel it is my favourite: David Lebovitz salted butter caramels.

Here are some pictures of the dipping process which can be the make or break of the shelf life of the caramel. Any chinks in the chocolate coating and the caramel may start to cystalise, seep out and get up to all sorts of mischief.

The caramel would usually be poured into a frame or square pan to set and cool overnight. To make the dipping process easier a thin layer of untempered chocolate is spread over the top surface and then the caramel is cut into whatever shape you want. The thin chocolate layer is much easier to cut if the chocolate is untempered as it will set softer and ultimately it will be fully covered with tempered chocolate and be the base of the finshed bon bon so any cooca butter bloom will not show. This layer makes the bon bon easier to handle and less likely to stick to the dipping fork.


Drop the piece into the pool of tempered chocolate caramel side down and then using a dipping fork tip the piece over by pushing down on one edge.


Carefully flip the item over by pushing down one one side and then lift out of the pool of chocolate.


The coating later is now on the bottom and will be a firm base on which to lift the piece out on the fork. Try to tap off any excess chocolate before transfering the piece carefully to a sheet of waxed paper onto a cellophane sheet. Try to ease the chocolate off gently making as little an impression into the chocolate coating as you do so. It is often around the forks marks that the coating is dented and this is a weakness where the caramel may try to seep through.


At this point the chocolate will be too liquid still to mark a pattern so move on to the next piece to dip but once this is deposited onto the tray, go back to the last piece, and using the fork to gently plunge and lift across on the top surface mark as good a pattern as you can. Mine are totally random but heck it all tastes the same.
Remember to keep stirring your pool of chocolate to keep the temperature even, and for plain chocolate you are trying to maintain 31 degrees centigrade.  You will most likely get some solidified chocolate around the edges of your bowl and try not to bring any solid pieces back into the pool. Better to gently melt these off with a hot air blower (hair drier). So long as the chocolate pool is not heated up more than  a couple of degrees it should stay in temper but you may need to let it cool down again and keep stirring to allow it to settle again.


The general advice is to only try and temper a minimum of 1 kg of chocolate and not much less. This means you will often be left with a large amount after you have dipped whatever you have prepared.  I quite like to use up the reservoir while it is still in temper and good plain biscuits make great dippers. I even had some caramel trimmings that I managed to sandwich between some rich tea fingers, Twix eat your heart out!


So this post is being submitted to the August 2013 We Sould Cocoa, a round up of which will be up for view by the end of the month. Link to the round up is here: Elizabeths Kitchen Diary and all the challenges in this series are here:  Chocolette Log Blog.


Tuesday, August 13, 2013

Plum Cake - Eats Well with Custard


I came home with some freshly picked plums today and have made them into a cake to take into work tomorrow. Well more accurately I will be taking in what I have not already eaten for supper tonight.

The plums seemed too small to be Victoria plums, and also not as sweet as I think a Victoria would be, but they looked very much like them. Nonetheless they have made a very nice 'plain cake'. I love that expression, 'plain cake', I think it was used a lot more when I was a child, less so now. I wonder if it was used to reflect more the cost of the ingredients, higher ratios of cheaper flour and sugar and less of the more expensive butter and eggs thus giving a plain cake as opposed to a 'fancy' one. 'Eats Well With', however, is a bit of a new phrase that I first associated with Gary Rhodes though he may not have invented it. I suspect it trashes all the grammar rules as well as sounding a bit odd, so language purists please forgive me this once.

The recipe for this cake is taken almost exactly from one that appeared on  Dom's blog Belleau Kitchen last year. Please head over to mum makes a victoria plum cake to get the full recipe. My only change was to add yogurt instead of milk to the cake mix and to sprinkle the top with flaked almonds, oh, and to use a square tin.
 

I have quite a passion for custard, so many of my cakes and puddings are adorned with it and in this case it certainly suits the plain cake theme. Most of the time I will use a tin of cold bought custard. You may be feeling rather horrified at this point but custard lovers the world over will understand the attraction. Custard is nearly always instead of cream in my bowl. Ice-cream comes next as it is really just frozen custard after all, and then yogurt and then cream. Unless it is christmas pudding and then it has to be rum sauce (never rum butter). Dwelling on custard as I am, can anyone explain to me why those pots of 'fresh' custard from supermarkets have so much (too much) cream in them?

So here is the whole beauty, and unless I get the mega munchies later there should be plenty for folks at work.


Thursday, July 25, 2013

We Should Cocoa Challenge #35 - Ice-Cream


This month the We Should Cocoa challenge has us combining chocolate with ice-cream, and with the glorious weather we have had this month it is a very apt choice of guest ingredient. 

I knew straight away I would not be making my own ice-cream as I have yet to make a home-made ice-cream that I thought was worth the effort compared with some of the very good ones that can readily be bought from most supermarkets and stores.

So the question was what dish to choose that combined a bought ice-cream with chocolate other than one of the many ice-cream sundae variations. Well I found my answer while browsing through a recently purchased Mary Berry cookbook, 'Desserts'. The recipe that jumped out was 'Italian Tartufo'.

Now do not let the effortless looking perfection of the recipe book picture deceive you, these, like so many other too simple to be true recipes  will have you swearing like a trooper as you struggle to reproduce something remotely like the picture. But that said it was fun and the fact that mine were wonky and covered in very thick chocolate coating rather than the beautiful thin shell of the recipe really was not a problem. It might have helped if I possessed the large ice-cream scoop referred to in the recipe but I do not so a bit of make do was called for.

You start by soaking some amaretti biscuits in an almond or orange liqueur.


That is the easy bit over with. 

You then have to encase each amaretti biscuit in a 'ball' of ice-cream.
The ice-cream is put in the fridge to soften a little before taking a large scoop and pushing an ameretti biscuit into the centre. Maybe I had used too much liqueur in the soaking or my biscuits were substandard but the 'soaked' biscuit crushed down under the slightest pressure so little chance of pushing it into the ice-cream.

Once the ice-cream bombe is sorted this goes back into the freezer to harden up while you melt down the chocolate along with some butter and golden syrup to create a softer setting shell than you would get with pure chocolate.

I decided to make some chocolate disc bases on which to sit the 'bombes' while the chocolate coat was being added to the top.


Now it was impossible to do the next stage and take a photo at the same time but as best you can you coat the bombes with a thin layer of the melted and cooled chocolate and then quickly get them back into the freezer to set up. If you work quick enough you might be able to get the chopped nut garnish on while the chocolate is still slightly soft but I took too long trying to patch up the holes in my coating and had to just add the nuts as best I could at the end.


So after about an hour back in the freezer they were hard enough to served! The flavour combination was really good and as I was just making dessert for two it was not so much trouble if a bit messy.


The 'We Should Cocoa' challenges are hosted by Choclette of Chocolate Log Blog, and Chele over at Chocolate Teapot. You will find a list of the previous challenges on Choclette's blog.

Tuesday, June 25, 2013

Random Recipes #29 - Healthy & Happy

For this month's Random Recipe Challenge Dom of Belleau Kitchen has us focussed on summer dishes that make you feel healthy and happy. Dom's own random contribution was a prune and almond brownie and as I am a big fan of prunes, almonds and chocolate I know that is one dish that would make me very happy.

To make the random selection I chose 4 books from my collection that I knew either had sections that met the criteria or were all very much feel good summer type recipes. The books I chose were: Sally Clarke's Book, A Mediterranean Harvest by Paola Scaravelli and Jon Cohen, The Cook and the Gardener by Amanda Hesser and For the Love of Food, Vegetarian Recipes from the Heart by Dennis Cotter. From these four the Dennis Cotter was randomly selected by my other half and then excel kindly whirled out a page number for me within the 'Salads' section and the recipe was 'Minted Bean Salad with cumin crispbread'


I have never been to Ireland but if I did the cafeparadiso restaurant Dennis Cotter runs in Cork would be high up my list of places to eat at. I am not a vegetarian but his recipies are quite inspirational. They often require quite a few ingredients and may well need a bit of planning ahead but I have never been disappointed with anything I have made from his books.

This recipe was quite a simple one. I made a couple of substitutions by swapping chick peas for the dried haricot beans and using lebanese flat breads instead of european bread for the cumin crispbreads.

The lightly cooked green beans are mixed with the cooked dried beans and a dressing is made by lightly cooking a couple of chopped shallots and garlic cloves in a little olive oil. After a couple of minutes of cooking the mint (a handful or however much you like) and a splash of vinegar are added and the dressing is cooked for a few seconds more.

Then add the two sorts of beans to the pan and stir around briefly to warm through. It was a cold and blustery June evening so warm salads were more appealing than fridge cold ones.

The cumin crispbread was made by sprinkling olive oil and cumin seeds onto the flatbreads before baking briefly in a moderate oven until crisp.  They tasted pretty good but all the cumin seeds dropped off as soon as I tried to snap them into pieces!


Tuesday, June 11, 2013

We Should Cocoa Challenge: Mint


A 'skinny' truffle for June's We Should Cocoa Challenge


Garden Mint Truffle
From 'Adventures with Chocolate', Paul A Young
 
 
If you who have been around reading my chocolate posts before you will have noticed I am rather fond of the recipes from Paul A Young's book 'Adventures with Chocolate', so no surprise that I turned to it again for the 'mint' challenge. This month's challenge host is 'a kick at the pantry door',
 
 I was in two minds about this challenge as I am really not very fond of mint and chocolate together and I am sad to say it is still in my 'not bothered' list but this is none the less a simple and clean tasting truffle recipe.
  
I have referred it as a skinny truffle as there is no cream or additional fat added, just a mint infused syrup that is poured whilst hot onto the chopped chocolate and then whisked to a truffle texture.
 
I halved the recipe as I was very unsure of liking it and that was a good move.
 
  • Make a syrup from 50g of sugar and 150ml of water, boiling the sugar to fully dissolve, then add 18g fresh mint leaves to the syrup and simmer for 3 minutes.
  • Leave the syrup to cool and further infuse with the mint.
  • Chop 175g of a 64% plain chocolate.
  • Strain the mint leaves out of the syrup and bring the syrup back to a simmer.
  • Pour the hot syrup over the chopped chocolate and stir/whisk well to create the smooth truffle texture.
  • Allow to cool/set and then scoop into small truffle balls with something like a melon baller or suitable teaspoon.
  • Roll the balls in your hands to get a smooth surface and chill a little to firm up.
  • Melt some more dark chocolate in a shallow bowl and place cocoa powder in another shallow bowl. Temper the chocolate if you wish but the cocoa dusting will hide any whitish cocoa butter imperfections.
  • Quickly drop each ball into the melted chocolate and then into the cocoa powder. This bit is messy and I would say use whatever tools you like to move the balls into and out of each bowl. Fingers work but only use one hand in the melted chocolate or you will get completed glued up yourself. Roll each ball around gently to cover with the chocolate and then the cocoa powder and then leave a moment or two to set before attempting to lift the ball out of the cocoa and onto a tray.
 
Water based ganache truffles are best eaten very fresh as the flavours seem to dull far more rapidly than with a cream or butter ganache.
 
The 'We Should Cocoa' challenges are hosted by Choclette of Chocolate Log Blog, and Chele over at Chocolate Teapot. You will find a list of the previous challenges on Choclette's blog.


Thursday, April 25, 2013

We Should Cocoa Challenge: Honey

This month's We Should Cocoa challenge is to combine the magic of honey with wonderful chocolate. I had found a few recipes where there was a token amount of honey in an otherwise chocolate centred recipe but I really felt the honey should be centre stage for this challenge. So after much flicking of cook book pages and fruitless googling I  finally came across a recipe that not only had a generous measure of honey but very conveniently used up some of my cupboard lurkers as well. So  here is a boozy honey, fig, and chocolate cake. 


For this recipe I was able to bring out a very satisfying number of ingredients from the back of the cupboards. The bargain bucket of honey, rather old dried figs, some ancient sweet red vermouth, spelt flour, spices, dark chocolate buttons and some butter and an egg.

The cake is based on a recipe from Leon, Baking and Puddings by Claire Ptak and Henry Dimbleby.


The original recipe does not have any chocolate in but I love chocolate with both figs and red wine so a handful of chocolate buttons seemed an appropriate deviation.


My silicone pan was not quite large enough so this resulted in a rather messy looking finish but this is how to it went:

375g of chopped dried figs were soaked in 350 ml of red vermouth for a couple of hours. This soaking step is not part of the original recipe but my figs were quite old and much drier than when I bought them, so it seemed a good idea.

The fig and wine mixture was then brought to a boil with 1.5 tsps cinnamon and 0.25tsp ground clove.

The pan is removed from the heat and allowed to cool for ten minutes before adding 125g butter and 250g honey, stirring well to melt and incorporate all together.

Then after another cooling period of 10 minutes you stir in one beaten egg.

In a separate bowl weigh out 200g spelt flour with 1.5tsp baking powder and 1tsp baking soda.

Pour the fig mixture over this and stir to combine adding a handful of chocolate buttons with the last few stirrings.

Pour into a 20cm square lined tin or silicone pan, sprinkle with a few more chocolate buttons and bake at 160C for about 45mins or until firm to touch in the centre.

Now you should allow the cake to cool in the tin but I was too impatient and you can probably see the chocolate is still melted in this photo but it was cake o'clock, no time to wait.


So this is my submission for the April We Should Cocoa challenge run by Choclette and Chele